Sunday, 23 December 2018

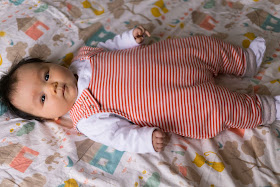
Baby leggings

Sewing for baby is addictive. It's quick, stash-busting, and oh so rewarding. The project I'm sharing with you today certainly ticks all of these boxes. But make no mistake - it was not all plain sailing.
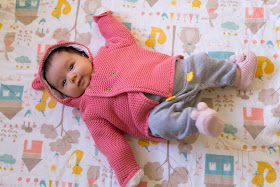
Because this happened just as I was feeling all smug hemming up the legs of the first pair, in a lovely combed cotton jersey from Girl Charlee (now sold out). Hey, I'm about to complete an entire project during Freya's afternoon nap! Then bang, the sewing machine chewed a big hole in the leg, right at the last step of the whole thing.  
Once I've calmed down and fished the holey leggings out of the bin, I thought of cuffs. And I'm pleased that they worked out really well. 
Now pleased with my ability to think on my feet, I kept up the momentum and made another pair the following afternoon. This time I used a beautiful black merino wool jersey remnant, picked up from The Fabric Store when we were in Melbourne earlier this year. This was my first time working with merino wool jersey, and it was a breeze. I hope that the breathable, soft and thermal qualities of the wool jersey will make the black leggings great for layering and keeping Freya warm over the winter months. 
And this time I did complete the project within one (long) afternoon nap! 

The pattern I used was the Brindille & Twig Leggings, which was well drafted, with easy instructions. This was my first time using a Brindille & Twig pattern, and certainly won't be my last! I made both pairs in size 3-6 months, and they seem to be true to size. 
And that's it for now! Have a wonderful festive period, and I'll be back in the new year with more selfish and newfound selfless sewing

Thursday, 13 December 2018

Reversible baby dungarees - Poppy & Jazz Dandelion

poppy jazz dandelion baby dungarees reversible
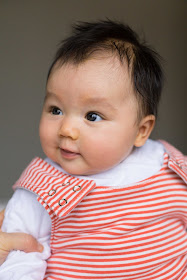
Having a baby is life changing. Shock horror, it has made me sew for someone other than myself. No, let me reword this -- it has actually made me want to sew for someone other than myself. I mean, look at these chubby cheeks... how can I not shower her with handmade outfits? 
poppy jazz dandelion baby dungarees reversible
I am partial to a good pair of baby dungarees. So when I saw the Poppy & Jazz Dandelion pattern by the wonderful Lisa at Sew Over It, I knew I had to make a few for Freya. I mean, they are reversible, which means two outfits in one. Bonus! 
poppy jazz dandelion baby dungarees reversible
And making baby clothes is seriously stash-busting. Remember my nursing sweatshirt? I didn't use up all the the multi-fleck fleece sweatshirt fabric, but what was left was nowhere near enough to make anything meaningful for me. But for baby? It opened up a whole host of opportunities. The fabric is warm and cosy (seriously, wearing the sweatshirt is like a giant hug), ideal for the main side of the dungarees, just as the weather turns colder.  
poppy jazz dandelion baby dungarees reversible nursing sweatshirt papercut undercover
On the reverse, I used a stripy cotton interlock from my stash (what did I say about stash-busting?), as the orange matches some of the flecks in the sweatshirt fabric perfectly. Although slightly lighter in weight, this interlock is also super soft and cosy. I am confident that this pair of dungarees will keep bubs warm in the winter months without too much additional layering. 
poppy jazz dandelion baby dungarees reversible
I made these in size 3-6 months, so the dungarees are a little big on Freya right now. But I couldn't wait any longer to share the project with you! With the double poppers, and the rolled up hem, however, I can see these dungarees with decent longevity. 

The construction was straightforward, and only took a couple of evenings. The only thing that was new to me was the application of poppers, but this tutorial made it super easy. They are actually much quicker to insert than bottons/zips/other closures, and so practical for baby clothes. I inserted two rows on the straps (optional in the instructions), in the hope that the dungarees will grow with Freya for a short while. 
poppy jazz dandelion baby dungarees reversible
I really feel like the "selfless" sewing paid off. I mean, who doesn't love matching outfits? The only problem is that my dear husband is now feeling a bit left out, but sadly for him, my new-found generosity in sewing does not extend further than my offspring... After all, he is already lucky enough to have got not one, but two pairs of PJ bottoms out of me, in my 8 years of sewing ;)
poppy jazz dandelion baby dungarees reversible

Friday, 23 November 2018

Sewaholic Renfrew top - nursing hack

This is a top that I made when I was in labour. True story. 

OK, I started this project when I was in my maternity leave waiting for the baby to arrive, but was about half way through when my contractions started. Since they were quite slow to get going, and in the calm spirit of hypnobirthing, I got on with my day and went to my sewing machine to finish this off. Good job I did, too, as it took about 24 hours before I went into "active labour". Isn't it lovely that my wonderful hobby of sewing got to form part of my positive birth experience?
I used the Sewaholic Renfrew pattern as a base, and basically followed Zoe's amazing tutorial to turn it into a nursing top. 
I have used the Renfrew pattern before, and used it as a base to make a maternity dress, but never got round to blogging it. 
Fabric looking familiar? This is the leftover Art Gallery cotton jersey from my Moneta dress. It's just as soft and cosy as I remember. The busy print was helpful in hiding the nursing access. 
The back is unchanged, straight from the pattern. 

For a project completed during labour, this has turned out quite nicely, don't you think? One maternity dress and a nursing top later, I am keen to try out the Renfrew pattern as a "normal" top next. Perhaps that can be a project for when I stop breastfeeding in a few months' time. 

For now, I am enjoying the special journey of trying out nursing hacks, and (spoiler alert) making a few things for the baby! 

Sunday, 18 November 2018

Papercut Undercover sweatshirt - nursing hack

Let's talk about breastfeeding today. Unusual for a sewing blog, I know.

Motherhood has been very kind to me - I had a very positive, intervention-free water birth, and baby Freya has been one healthy and smiley baby.

The only big challenge that I've faced so far was the breastfeeding. Before Freya was born, I was told how breastfeeding is "the most natural thing",  how "babies will crawl up to your breast and if left on your tummy skin to skin after birth", and how "it shouldn't hurt", and at worst "it will be a learning curve for both of you". 

And what a learning curve it was! My initial experience did not feel natural, baby had no idea where to go and preferred her own shoulders to my boobs, and it was bloody painful. 

Despite attending 3 antenatal breastfeeding classes, no one had warned me about the stress about being solely responsible for baby's growth/weight gain in the early days, the pain from poor latch/engorgement/blocked ducts, and how much of my day would be taken up with a newborn baby attached (did you know that when they say, "feed every 2-3 hours", you are supposed to count that from the start of each feed, and each feed could take well over an hour especially in the early days?). 

Don't get me wrong, I get all the benefits of breastfeeding. I just would've preferred to be forewarned about the difficulty of it so that I could be better prepared mentally. The key, as I've learned, was patience, perseverance, and getting help whenever you can. I know that what I'm saying above will not be relevant for most of you right now (well done and thank you if you managed to read on and got to this point regardless)- but if you found this post via Google because you wanted to make some nursing tops in advance of the arrival of your baby, you've heard it from me - breastfeeding can feel quite unnatural and difficult to begin with, and that is perfectly normal. 

Papercut Undercover Sweatshirt raglan zip Nursing Hack

Right, back to the sewing! After persevering, and finally succeeding with breastfeeding, I wanted to give myself a pat on the back, and reward myself with a few homemade nursing tops. 

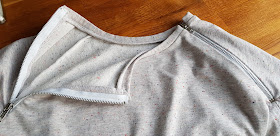
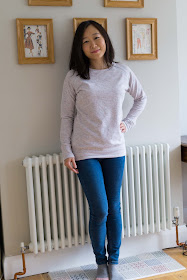
After seeing one of my friends in a nursing jumper with zips down the raglan sleeves, I was inspired to make one for myself, to see us through the colder months. The pattern that I chose was the Papercut Undercover hoodie, and I teamed it up with a very cosy multi-fleck sweatshirt fabric from Guthrie & Ghani, together with 8' exposed metal zips (although with hindsight, 9' zips would've worked even better).  


Papercut Undercover Sweatshirt raglan zip Nursing Hack
This is my first time using a Papercut pattern (although the Anima pants pattern has been in my stash for a while), and the first impression was great. I loved the packaging, and how robust the pattern and instructions felt (both pattern pieces are instructions are printed on a huge piece of brown recycled paper). Since I tend to trace out the pattern pieces for my sewing projects, I was very happy with this feature. 

One thing to note is that this pattern (and I understand, other Papercut patterns) come with a 1cm seam allowance. This was perfectly fine, though I had to keep reminding myself not to sew 1.5cm seams on autopilot. 

Papercut Undercover Sweatshirt raglan zip Nursing Hack
Here's how I've turned this pattern into a nursing top. It's not difficult, though as it turned out, this pattern was not ideal for this project, as the front Raglan seams are slightly curved. There are plenty of similar styled patterns out there, and the hack below should work for them, too. 
  1. Add 1cm seam allowance to the front sleeve seams, all 4 of them (2 on the front piece, and 2 on the sleeve pieces). This is to allow for an easy insertion of the zips later on. 
  2. Split the neck banding pattern piece into two, based on the ratio of the length of the front and back neckline. Add an inch or so to the length of both pieces. The banding should be shorter than the actual neckline length, so that it would lie flat when finished. 
  3. Interface these seams with strips of medium weight interfacing which extended slightly beyond the seamline. 
  4. Stablised the front neckline (the bit between the zips) with clear elastic. Colette has a very helpful tutorial here. 
  5.  Sew the sleeve back seams. 
  6. Attach the banding pieces to both front and back necklines. 
  7. Insert the zips to the front sleeve seams. The easiest way to do this would be to sew a centred zip, but I wanted to push myself and learn a new technique, so I added exposed zips here by following this tutorial
  8. Sew up the inside sleeves and side seams in one go. 
  9. Add cuffs and hem/band. 
  10. Tidy up the loose overlocker chains, and where the zip ends with the neckline bands with a bit of hand sewing. 

Papercut Undercover Sweatshirt raglan zip Nursing Hack
 And that's it! So simple, isn't it? 
Papercut Undercover Sweatshirt raglan zip Nursing Hack
I'm so pleased to have pulled off this project, (thank you Freya, for napping well, and thank you hubby for freeing me up in the weekends to sew!) and just love how cosy it is. It's had so much wear that I'm struggling to remember how I managed to feed Freya without it! I'm also confident that it will last me long past the breastfeeding days. A real winner, don't you think?  

Tuesday, 13 November 2018

Sewing for baby!

baby quilted blanket brushed cotton diy
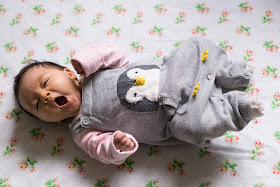
Hello, my name is Freya and I'm new here! 
Lotta Jansdotter baby snuggler swaddle wrap
Not long after I was born, my mummy made me "model" the swaddle wraps that she sewed "for me" before I was born, although she was fully aware of my aversion towards being swaddled, and my incredible ability to wriggle out of them.

Lotta Jansdotter baby snuggler swaddle wrap
Don't worry though, I freed my arms within a matter of seconds! 

Then she made me pose on the nursing pillow with the cover that she sewed up... 
DIY nursing pillow cover
And you know what? She was absolutely right - having a spare cover has come in very handy indeed ;)

Alright, thank you Freya, that's quite enough baby talk for now. Mummy can take it from here. 

So, my darling baby daughter arrived 10 weeks ago, and our lives have truly been changed forever. My dear husband and I are both completely smitten, and we wake up every morning still in awe that a little person has joined our household! Sure, not everything is as we expected - after all, who knew that baby Freya would hate being swaddled so much after all the efforts that I've put in in sewing up those swaddle wraps? But we are both enjoying the lovely surprises and new challenges that parenthood has thrown at us so far, and are working very well as a team. baby padded play mat diy
Once we've moved past the precious early weeks (and made Freya pose in my earlier makes), I've been back to my sewing table. 

The first thing I made was a padded play mat for Freya, using some poly wadding, a piece of floral Cath Kidston cotton, and some polka dot grey polycotton (for the bottom layer - not photographed) from my stash. This has been a great stash busting project! 

Although we already had a "baby gym", I wanted something that would fold up small for that portability factor. And of course, this was super simple to make - I sewed the 3 layers together at the edges, leaving a few inches unstitched, turned it inside out, topstitched all around and voila - we have a play mat, and much more storage space in the sewing room! Freya has since spent quite a bit of time on it, and seems to enjoy it so far. 

baby quilted blanket brushed cotton diy

Having enjoyed the simplicity of sewing a big rectangle with the play mat, I then used up the leftover brushed cotton fabrics from the swaddle wraps, with some bamboo batting to make a quilted baby blanket. I basically used the same method (similar to these here and here), but added a couple of rows of stitching vertically and horizontally down the middle of the blanket to ensure that the bamboo quilting stays in place. 

This was initially made for wrapping Freya up warm in the winter months, so for now she is loving lying, and sometimes napping on top of it.  

It hasn't all been about the baby though. I'm very pleased to say that I have also managed a spot of selfish sewing, and made a few nursing clothes (I suppose this is still baby-related, but some of the nursing clothes will be worn beyondyond my breastfeeding days). Stay tuned and I'll be back to share some of these with you in the coming days, perhaps when Freya has another long nap! 

Monday, 3 September 2018

Nursing pillow cover

We have been pretty disciplined in what we've bought in readiness for the new arrival, as it is so easy to get carried away, especially with a first baby. One of the things that we did invest in, though, was a nursing pillow, which came highly recommended by many experienced mums. 

Having met a few babies, I know that I'm gonna need more than one cover for this hopefully very useful pillow. What a nice little project for my maternity leave :D
The nursing pillow that I purchased was a Cuddles Collection one, which is nice and firm (and seems to be a popular choice in the UK), and it came a white polycotton cover with tiny grey stars. For my spare cover, I had a metre of a cotton swallow print in my stash which was perfect for this project. 
It has a zip closure on the reverse across the widest part, enabling easy changing; the zip is then covered by a flap, which ensures comfort in use.
I liked this design, and decided to replicate it exactly for my spare cover: 
  • I folded the original cover, traced out the shape on tissue paper and added seam allowance for the front piece; 
  • For the back pieces, I slashed the front pattern across the top, mirroring where the zip is in the original cover, and added 6cm and 1.5cm to the top and bottom pieces respectively ( in addition to the seam allowances).  
It was quite straightforward to make by studying the original cover, but please shout if you would find a tutorial helpful for this. Most of the tutorials that I've seen online use an invisible zip across the top. 

And here it is! If I may say so myself... the fit was perfect, and I couldn't have been happier with the result. 


A close-up of the zip (I used a 26-inch one, which was just right for the job): 
  
What's next? I'm still a bit behind in blogging about my maternity makes (and know that I need to crack on before the bump shrinks), as  I'm about to start making some nursing clothes, too, assuming that the baby gives me a few more days to play with my sewing machine still. So watch this space! 

Saturday, 1 September 2018

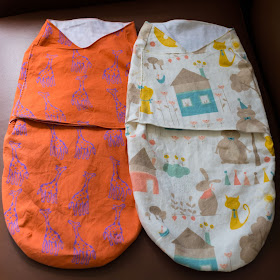
Baby swaddle wraps - Lotta Jansdotter's Snuggler

Lotta Jansdotta Snuggler Baby Swaddle Wrap


Greetings from maternity leave! I'm officially in the zwischen period, where my baby is basically fully cooked but is still sitting comfortably in my belly. Ask me again in a couple of weeks, but at the moment I'm loving every minute of it! Don't get me wrong, I am very excited to meet the new arrival, but I also know that this "in-between" time is precious: soon enough I won't be able have all day to myself, and to be able to nap, sew, bake, have a pedicure, and binge watch box sets to my heart's content without worrying about another little human's every need. 
One of the things that I wanted to make before the baby arrives is a swaddle wrap, or two! Apparently a lot of newborn babies love being swaddled to sleep, as it recreates a womb like cosiness, and prevents the startle reflex. Although I've learned how to make a "baby burrito" with a blanket, I figured that a velcro fastened swaddle wrap would be more fool- (and sleep deprived-) proof!
Lotta Jansdotta Snuggler Baby Swaddle Wrap
I used the free Baby Snuggler pattern by Lotta Jansdotter, and it worked a treat. I enjoyed making it so much that I made another one straight away!

The first version I made was using a super cute brushed cotton, from Moda's Corner of 5th & Fun collection. It's so soft and cosy! For my second make, I used a lovely giraffe batik from my stash, bought from Dewi Mas in Denpasar a couple of years ago. Both versions were lined with a plain white brushed cotton, due to my aversion to fleece, and not wanting to make the wraps too warm.
Lotta Jansdotta Snuggler Baby Swaddle Wrap
Having read a few reviews, I've picked up the following tips from the blogsphere:

  1. Taping together the pattern was not the easiest. Zaaberry made this much easier though by showing us how it all fits together.
  2. Similarly, for Velcro placement, Jedi Craft Girl provided a great guide on her blog.
  3. I used Wondertape to secure the Velcro, and sewed the Velcro onto the outer and lining layers first, i.e. before step C in the instructions, rather than adding Velcro at the very end. This was my first time working with Velcro, and I have to say that it was pretty straightforward.
  4. When sewing the outer and lining layers together in step C, I went slowly, and started from one corner of the foot pouch.
  5. For step D, instead of slip stitching the opening, I topstitched the whole thing as I prefer the finish.

Lotta Jansdotta Snuggler Baby Swaddle Wrap

And there you have it - my two baby swaddle wraps, ready for the new arrival. They look so cute and cosy, and I'm very happy with how they've both turned out! I'm sure the baby will be able to help me model them soon enough ;) 

How about you? Did you ever engage in any baby sewing? I'd love to hear about any tips, or any fun/useful project ideas from you!

Lotta Jansdotta Snuggler Baby Swaddle WrapLotta Jansdotta Snuggler Baby Swaddle Wrap

Thursday, 28 June 2018

A maternity & nursing dress - Simplicity 1469/Megan Nielsen Amber


Are you loving the heat wave, my dear readers? I certainly am! We were lucky enough to have pre-booked a long weekend in the beautiful Cotswolds last weekend, to celebrate my mother-in-law's 60th birthday - those honey coloured, quintessentially British villages sparkled in the glorious sunshine. 

What better time to show off my latest make? 
Simplicity 1469 Megan Nielsen Amber maternity dress
It's a multi-purpose dress that can be used both during pregnancy, and also for breastfeeding when the baby is here! 

Here's an inside-out picture of the bodice to show you the access ;) 

Simplicity 1469 Megan Nielsen Amber maternity dress
The pattern that I've used is Simplicity 1469, which is designed by Megan Nielsen, and from what I can tell, this is based on the Amber maternity pattern. I bought the Simplicity version to save me from having to print the PDF. I made View A this time, in size XS.   
Simplicity 1469 Megan Nielsen Amber maternity dress
The fabric I used was a coral cotton jersey from Minerva, at a bargain £5.99 per metre. For the bodice lining, I chose a lightweight ivory grey marl jersey, because a few reviews that I read had mentioned about the nursing access being visible on the outside, so I wanted to reduce bulk where possible. I also overlocked the "access windows" rather than hemming them for the same reason. 

As someone who is still relatively new to sewing with knit fabrics, I found it easier to work with this coral jersey than the lighter stripey jersey used for the Givre dress. I'm pleased to report that I did not experience any issue with the twin stitches this time, but I did skip the wonder tape as well. 

Simplicity 1469 Megan Nielsen Amber maternity dress

Although this isn't a dress that you can knock up in one evening, I did not find the construction too complicated. The only slight issue that I did have was a slightly overstretched neckline, which resulted in a bit of gaping (you might be able to tell from the first photo), but it is subtle enough to blissfully ignore. If I make another version, though, I would look to avoid this from happening again. 

I also shortened the skirt quite a bit so that the hem sits above my knees. 

At 29-week pregnant, and now proudly in my third trimester, I am getting quite big! I am enjoying the pregnancy, though, especially now that the nausea is firmly behind me. It is quite amazing, if not a little bit strange, to feel this active little baby moving and kicking inside my belly. 

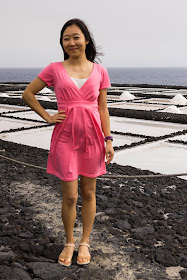
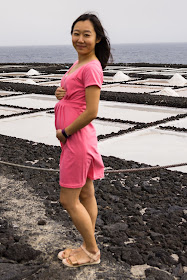
Looking back, it's funny how I thought I was huge when I first wore this dress in La Palma at 16-week pregnant! Look at that tiny bump :) 

Simplicity 1469 Megan Nielsen Amber maternity dress

This truly is a dress that grows with you. Given that it will last beyond the pregnancy, I am planning on making another (either a dress or top) if I get the time. 

Simplicity 1469 Megan Nielsen Amber maternity dress

These photos were taken when we visited the salt fields at Fuencaliente, on a day where there was bad calima. Who would've guessed that this was in the Canary Islands, and the photos above were the UK?

On that note, let me finish this post by sharing a picture of Arlington Row, originally built in 1380, as featured on the inside cover of a lot of British passports! Possibly the most British photo that I've ever taken! 

Enjoy the beautiful weather guys! 

Saturday, 7 April 2018

Sewing for two!

Hello my dear readers! 

It's been a few months since my last post (again), but guys -- this time I have a good excuse. I am very pleased to announce that hubby and I are expecting our first baby in September! The last few months have been spent eating dry crackers, drinking lemon & ginger tea, and generally just doing my best to keep food down, so blogging has not been high on my list of priorities. 
It's not been all bad, though. For starters, my boobs are certainly gearing themselves up for something major, as I'm literally bursting out of my bras! Bye-bye, at least temporarily, to the need for making SBA! I'm not sure I have ever been so excited :D

Another "bonus" is my much improved and relaxed mood, and it appears that those pregnancy hormones have had a calming effect on me. Let's hope this lasts!

I've also been lucky to have not suffered too much in terms of exhaustion that many others experience; in fact, I've managed to keep up my work, my usual exercise (yoga and pole fitness - don't worry, this has been approved and actually recommended by both the midwife and GP), and even managed several long (20km+) walks on our recent break to the beautiful island of La Palma over Easter (where the photos below are taken). Although I'm still suffering from waves of nausea, things are definitely on the up, and I'm finally beginning to gain a bit of weight, too. 

Even from as early as 10-weeks, when I had managed to lose a few pounds through all the vomiting, I began to notice a little bump in the evenings. Not long after that, certainly before the end of the first trimester, I could no longer button up my trousers/jeans. 

This brought me back to my sewing room, renewed with energy to knock up a maternity wardrobe. The first things I made, to see me through the first trimester without needing new clothes (and to an extent to help me hide my ever expanding waistline), were a couple of belly/bump bands. They were easy to make, using fabric from my stash, and are so comfortable to wear. I'll write a short post on those another time, as I couldn't wait to share a shiny new dress with you today! 
Its the Deer & Doe Givre (maternity) dress. I've wanted to try a Deer & Doe pattern for so long, and it certainly did not disappoint! 
One of the best things with this pattern, which sets it apart from all the other maternity sewing patterns on the market, is that it offers 2 "bump sizes" based on how far along you are in the pregnancy. I'm 17.5 weeks at the moment, i.e. an awkward middle ground where most shop-bought maternity clothes are far too loose, but my usual clothes are far too tight. Givre comes to the rescue! See the gathers in the side seam in the picture above? These are designed for 3-6 months bumps, and the dress fits perfectly, yet still leaving more room for the coming weeks. 
I used a cotton jersey with 5% elastane from Mineva, in white and rose pink. It is easy to handle (not too much curling), comfortable to wear (cotton + jersey + a good amount of stretch = recipe for comfort), and not too see-through (thank goodness). The stripes are also broad enough to allow me to sew up a neckline band that is in rose pink only, without needing to buy matching fabric.  
I can't tell you how happy I am to have embraced sewing with knit fabrics over 3 years ago (seriously? It's been more than 3 years since I made my lady skaters?), as the skill has certainly come in handy now! I'm still learning, though, and I have to admit that getting the twin needle stitching right, particularly for the hem, took quite a few goes. I had quite a bad case of skipped stitches despite using stretch/ballpoint needles. I suspect this is due to the use of wonder tape (since this only happened in the skirt hem where I used wonder tape), and even now the hem/twin stitching is not as  stretchy as I'd like it to be. If you have any tips on how to avoid skipped stitches, and/or how to make the stitching a bit more stretchy, I'm all ears -- please drop me a comment! 
Overall though, this dress was a pleasure to sew. I omitted the yoke, and it was basically like sewing a long t-shirt, with clear elastic gathering in the side seams. In addition to the yoke omission, I also shortened both the bodice and the skirt slightly to suit my petite frame. Otherwise this fit straight out of the envelope in size 34. Even the stripe matching was not as hard as I feared - I focused on the parts of the side seams above and below the gathers, and job done! Here's a really clear tutorial from Taisia if you wanted to find out how to match striped knit fabrics for yourself. 

I loved how this turned out, and enjoyed walking around Santa Cruz, showing off my bump, and posing in front of colourful buildings in the sun. 

I'm already planning my second version in my head. Maybe a top next? Watch this space! 

Finally, since you loved my astro picture from my last post (and incidentally another Canary Island), I'm going to reward you for reading this lengthy post with another from La Palma, which is a starlight reserve. How about a milky way (amongst many other stars) above a cloud-filled crater? Enjoy!