Sunday, 1 November 2015

Vintage skirt with inverted pleat

Hello all, hasn't it been a while? Hope all is well with you guys! 

Over the last couple of months, I've kept myself really quite busy -- settling into my new job, doing a bit more decorating before the days became really short, and then enjoying a wonderful road trip along the west coast of the US to celebrate the hubby's 30th. It's been a fantastic couple of months in many ways, but the one thing that did suffer during this busy time was my sewing. 

However, with the new job all going very well (yay), and the days much colder and shorter (and foggier, if today is anything to go by!), I'm back where I belong - my sewing room

What better way to resume sewing than a very on-trend inverted pleat skirt from a vintage pattern? 
Vintage Simplicity 6091 inverted pleated skirt
Please excuse the dim photos - I waited and waited this afternoon for the fog to clear up, and longed for some natural light to come into the house, but had to give in to some artificial lighting in the end, as I just couldn't wait any longer before sharing the project with you ;) If the hounds tooth pattern isn't showing up too well, click on the image to enlarge and it'll look less fuzzy, I promise. 
Vintage Simplicity 6091 Inverted Pleat Skirt

The pattern is the Simplicity 6091 from my stash, from 1965. To think that it is an entire 50 years later that I'm picking it up and making my own version is pretty incredible.  
Vintage Simplicity 6091 Inverted Pleated Skirt Pattern

The fabric that I used - as you can see from the John Lewis reduced to clear label below, it's quite a mix, with 65% poly, 32% viscose and 3% spandex. The end result of this funky mix is a beautifully soft, slightly stretchy, and comfortable to wear fabric, but one that ravels like there's no tomorrow. In fact, it was ravelling so fast that I felt rushed to finish this project in 3 days; even then I was worried that I would wake up the next day and only find unravelled thread all over my sewing room, with the half-finished skirt nowhere to be seen! 
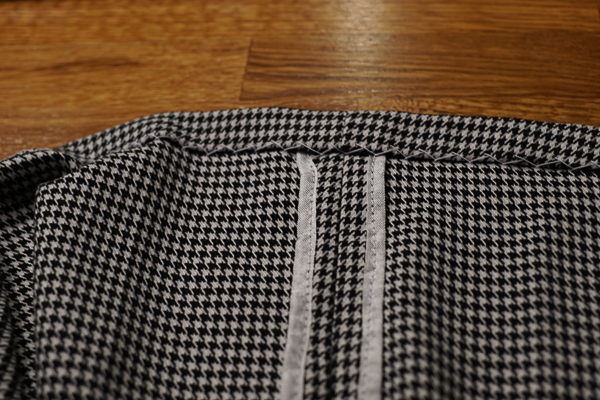
This is also why I opted to finish the seams with some rayon seam binding, which I picked up from the Garment District in NYC over a year ago. This is the first time I've used this stuff, and all the other sewers are right - it is amazing! This tutorial by Laura Mae was very informative, and set me on the right path straight away.  

Vintage Simplicity 6091 Inverted Pleated Skirt Rayon Binding
Vintage Simplicity 6091 Inverted Pleated Skirt Waistband

In addition to the seam binding finish, I had another few firsts with this project: I made my first inverted pleat (it was pretty straight forward), and more importantly, this was the first vintage pattern that I used that did not require any real pattern alterations! Hooray! All I did was cutting 6 inches off the length, and off I went chopping up the fabric! Thank you, Simplicity! 

One more close-up photo -- topstitching above the inverted pleat
Vintage Simplicity 6091 Inverted Pleated Skirt topstitching

So there you have it, my first vintage make of 2015, based on a pattern from exactly 50 years ago! What this also means of course, is that I'm not doing terribly well with my Vintage Sewing Pattern Pledge of sewing 3 vintage patterns this year... But hey, there's still time ;) Stay tuned and I'll be back soon, and hopefully with another vintage make! 
Vintage Simplicity 6091 Inverted Pleated Skirt

Sunday, 23 August 2015

Lace dress

Hello everyone, I hope you are all having a wonderful weekend! 

I have quite a project to share with you today. It is pretty special on a number of accounts: 

1) I have finally tackled one of my biggest fears when it comes to sewing...working with lace. And boy, did I throw myself into the deep end with this one! 
2) I have not had such a challenge since completing my wedding dress
3) This is my first White Tree Fabrics Blog Team make!
McCalls 6505 lace dress
The fabrics
White Tree Fabrics kindly provided me with a beautiful heavy corded lace and a luxurious duchess satin for the underlining. If there ever was a match made in heaven, it was those two! What's more, I already had a piece of cotton lining with a very similar shade. I like it when a plan comes together ;) 

I wanted to give this stunning piece of heavy corded lace the attention it really deserves, and that could only mean one thing - appliqué seams. Yes, it is time consuming, but I adored the all over, seamless look that's often seen on couture lace dresses. 
McCalls 6505 Lace Dress Side
Can you spot the dart and the side seam?

I also love the scalloped selvage of the lace, and used it everywhere -- I made sure the pattern was cut so that the hem falls onto the selvage to minimise the hand stitching. 
McCalls 6505 Lace Dress
The pattern

The pattern is McCalls 6505, which I have had in my stash for quite some time. I love the design, and the photo on the envelope, but have read mixed reviews on the instructions. 

And they were right of course, as the steps described were pretty confusing! Thankfully, though, since I was using appliqué seams, I needed to change the steps anyway. So I spent hours checking all my sewing reference books, and searching through the internet, to come up with a plan that would work for my dress. 

My steps

Here's the nerdy part. I've summarised the key steps I went through, in case it helps anyone else who has been looking at attempting this pattern, or making a similar dress. 

Firstly, the terminology. I'm going to call the lace layer, er, lace, then the duchess satin as "underlining", and the cotton lining the "lining". 

Underlining and lining

1. After making a toile of the lining, I took in at the waist, chopped off some length, and made the slashed side dart into a full, overlapping dart. I also transferred these changes to the pattern for the lace layer. 

2. Making the underlining, and the lining layers, leaving the centre backs open. 

3. Attaching the underlining to the lining at the top/neckline, across the entire top edge. Understitch. 

4. I also made a waist stay, to take some of the weight off the shoulders... literally! This was attached to the lining layer (i.e. sandwiched between lining and underlining), and brought through the lining via buttonholes. 
McCalls 6505 Lace Dress Waist Stay
Cutting the lace

5. Thread trace the pattern pieces on the lace, including the marking for the darts. If I were to do this again, I would thread trace the actual stitching line, as opposed to the cutting line, i.e. I would exclude the seam allowance. 

6. Take great care cutting around the thread, allowing full motifs outside the thread markings. I would say this was the most crucial step in the whole project.  

7. The appliqué seaming begins! Here's a photo of the side dart with the basting and pins. I took my time with the hand stitching here, ensuring continuity of pattern where possible.   
McCalls 6505 Lace Dress Applique Seam

8. I then tried stitching the side seams with a narrow zigzag on my machine, as a shortcut to doing the appliqué seaming. It wasn't the smoothest experience, because the heavy cords often got a bit stuck in the feed dog, but I went slowly and it worked ok. 

Sleeves and neckline

9. I drafted the cap sleeves, rather than using the ones from the pattern, because I wanted to take advantage of the scalloped selvage. 

10. Time for more hand stitching... to attach the sleeves. 

11. I cut a strip of selvage from the remaining fabric, and hand sewed it to the neckline, going from centre back to centre back (via the front!), and also "finished the arm cycles (the portion not covered by the cap sleeves) the same way. 

Attaching the layers

12. After trying the layers on together, I hand basted the lace to the underlining at the centre front and underarm side seams. 

13. I took all three layers together at the centre back, and handpicked the zipper through all layers. Finish the portion of all layers below the zipper. 

14. I then made some covered snaps with the lining fabric, and sewed two pairs at the top of the centre back to the lace. 
McCalls 6505 Lace Dress Covered Snaps
15. Finally (!), I hemmed the underlining so that it hangs above the scalloped lace hem, and then the lining so that it is even shorter and is invisible when worn. 

Needless to say, it was a time consuming project. This wasn't my usual "weekender", but it was much more rewarding. I was finally ready to attempt working with lace, and I am really pleased that doing this the couture way has worked out well. 

I must admit though, this was possibly the messiest project that I have ever done! All that thread tracing, snap covering, pins that slipped through the net (yep!) and of course trimming off the excess lace from appliqué seams... My sewing room is a complete mess, and I keep finding red fluff everywhere in the house, and on our clothes... I'm pretty sure that I'm not the only person who's pleased that this project is finished! 
McCalls 6505 Lace Dress

McCalls 6505 Lace Dress back zipper

Now over to you - do you sew with lace? Any tips to share? 

Friday, 24 July 2015

Dropped waist summer dress

Hey, everyone! Greetings from the highest point of south east England! Here I was (last Sunday), at Leith Hill, just south of Dorking in Surrey, which was a lovely spot. From there, apparently I was supposed to be able to see both London to the north, and the sea beyond Brighton in the south on a clear day -- although my eye sight wasn't quite so brilliant, I am pleased to confirm that it did offer far reaching, and stunning views.  
Self-drafted dropped waist purple dress
Yep, I made another summer dress! It all started when I saw someone on the train with a lovely dropped waist sundress on a hot summer day, and that was all the motivation and inspiration I needed to knock this little number together. Long term readers will know that I have a soft spot for a dropped waist silhouette (remember this spotty outfit here, together with a simple tutorial?), and I realised that I didn't have anything in that shape in my summer wardrobe, especially anything less structured. 

I immediately thought of this purple fabric of an unknown composition (it was a super cheap buy from a market - who am I to be all OCD about what it's actually made of? :p) in my stash, and without hesitation I started to draft a simple side dart bodice pattern for this dress. The great thing is, because the fabric cost next to nothing, and I had 5 metres of it (did I mention it was cheap?), I wasn't too concerned about messing it up. Thankfully, with a bit of luck, the dress came together within a matter of a few hours. 
Self-drafted dropped waist purple dress
I love it when a plan comes together ;) Excuse some of the creases, I was too impatient to press it properly before putting it on!
Self-drafted dropped waist purple dress
Back view

Self-drafted dropped waist purple dress back
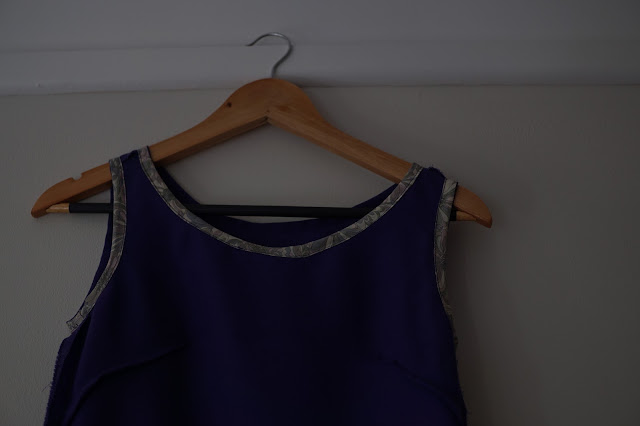
An inside-out view. I finished the neckline and armholes with a single-folded bias tape, which I made from the scrap from my 1940s fitted, Sew for Victory blouse

Self-drafted dropped waist purple dress inside out
Despite not knowing what the mysterious fabric is, I have found it very comfortable and cool to wear, and indeed I felt pretty cool wearing it, too! There is a slight niggle with it, though - I'm no longer sure if purple is my colour! Just as I was wondering that when I put on this dress, my dear (very honest) husband said, hmm I don't know about that colour on you...!

Anyway... How's your summer sewing going? And happy weekend, everyone! 

Thursday, 16 July 2015

Free sewing pattern - Picnic Dress!

I've got a little freebie for you today - a pdf copy of my Picnic Dress pattern! For me, this is the perfect summer dress pattern -- it's simple, quick to sew, and is pretty versatile for achieving different looks with different fabric choices. 

This was the version I made last week: 
Self-drafted Free Pattern Picnic Dress Pink
And this was how my love affair with this little pattern began, and indeed where the name came from:

I've only used floral prints so far, but some bold, wide stripy prints could look super trendy, too. 

At the moment I've uploaded the pattern in my size only, but I do hope to grade it to a multiple sizes in the future. Do bear with me ;)

Sizing
To help you determine whether we are "body doubles" (hello!), and/or enable you alter the pattern to fit you, I am a little lady who is 5'3 tall (160cm), wear UK RTW 4-6, US 0-2, fit Simplicity patterns in 4-6, and Burdastyle 30-32, and often benefit from a slight small bust adjustment

What you'll need
  • 45'/112cm wide light/medium weight woven fabric - you will need 180cm. I think cotton works perfectly for this pattern, but I can also see this working with some cool, summery and drapey viscose/rayon prints. You could also achieve a smarter look with a taffeta, with some added boning in the princess seams. 
  • Interfacing is optional, and you'll only need a small piece (some scrap pieces perhaps?) for the small facing pieces only.
  • Invisible zip 16'+ 
Instructions
Firstly a word of warning, I didn't write instructions for this one. This is because it is quite a simple pattern, with princess seamed bodice and a rectangular gathered skirt and spaghetti straps, and I would expect that many of you could sew this up in your sleep ;) That said, if you would like to sew it, and would like some help with the steps then please do let me know and I'll write them up. 

To download the pattern, click on this link (if you haven't already clicked on the one at the  the beginning of this post). When you print, make sure you choose "actual size" rather than "fit to page", and do measure the test square before you start cutting. Then you are good to go :D 

Here is a close-up of the bodice
Self-drafted Free Pattern Picnic Dress Pink
Back view
Self-drafted Free Pattern Picnic Dress Pink Back
Enjoy the free pattern! I hope you like the pattern, and I can't wait to see what you make :) Any comments or questions, please get in touch. 

Sunday, 12 July 2015

Pink Picnic Dress!

Update - You can now make your own version with the free pattern here! Enjoy ;) 

Summer is here, and I am really loving the long and warm days, as well as the light and breezy evenings. What better way to celebrate it than joining in with the Sundress Sew-a-long 2015, kindly hosted by Heather B?

Remember my first Picnic Dress? It has been one of my all-time favourites, which I find myself reaching for as soon as the weather turns warmer here, as well as packing for holidays. More than two years have now passed (how time truly flies), so it's time to make another! 
Self-drafted Free Pattern Picnic Dress Pink
This time I made it with a beautiful lightweight pink floral fabric, which has been whispering to me, wanting to become a Picnic Dress from the moment we first met. Isn't it just the prettiest and the most girlie sundress? 
Self-drafted Free Pattern Picnic Dress Pink
It was so quick to sew, and only took a couple of afternoons/evenings to finish! It was a simple self-drafted pattern, which I very much enjoyed using again. Want to make your own version? I am planning on sharing the pattern with you shortly -- initially it will be in my size, but I do hope to grade it to other sizes when I have the time and patience for it. Watch this space! 
Self-drafted Free Pattern Picnic Dress Pink

We are so lucky to have all this beautiful countryside right on our doorstep. All this is just a 5-minute walk from our house! What's more, just last week, we spotted a few deer in the commons land by our house on our evening walks, yet it's difficult to believe that we are less than an hour from central London. Last summer we had been so busy sorting out the house, that we didn't have much time to appreciate our surroundings. Whilst that was very rewarding in its own way, we really are able to enjoy the summer and the Surrey Hills this time, and just hope that the good weather will last for a good few more months!
Self-drafted Free Pattern Picnic Dress Pink

Thursday, 25 June 2015

Belated MMM round-up!

My goodness, hasn't it been a while? I've had quite a bit going on in my life in the last few months, but as soon as it all settles down I'll be able to update you with all my news. Before then, I feel obliged to upload some snaps from my first participation at MMM :)

I should declare now that although I managed to hit my target of wearing me-made clothes for at least 3 times a week with relative ease, I did not religiously photograph myself so there were quite a few days/outfits missing. But here are the ones that I did take: 

Let's kick off with the jolly holiday pictures - we spent just over a week in Mauritius (it turned out to be a much needed holiday, after a few stressful issues lately), and it was fabulous! 


In contrast, at the beginning of the month, I got a lot of wear out of my Navy Wool Coat, since it was still pretty cold in the UK. 

Then there were a few work outfits: 


Also my Geometric vintage blouse, my red Lottie blouseModest raspberry dress and old favourite dress had at least a feature each this month as part of a work outfit.  
Then we have some more relaxed times, including dress-down Fridays as well as weekends/evenings. 

Overall I'm pretty happy with how my first MMM went, and would be keen to participate again in the coming years! Now I'm going to head to the blogsphere and check out everyone else's selfies ;) Before I go though, let me leave you with one of my favourite snaps from the vacation, which was taken from a sun lounger by the infinity pool at the hotel:


Until next time, stay well and keep sewing! 

Sunday, 26 April 2015

Me-Made-May '15!

I'm finally ready to participate in Me-Made-May! Here's my pledge:

I, Alice from Queen of Darts, sign up as a participant of Me-Made-May '15. I endeavour to wear one me-made garment at least 3 times per week for the duration of May 2015

This has been something that I've wanted to do for the last couple of years; however, some part of life/work always got in the way, and frankly I didn't think I could quite handle it all, or at the very least being able to enjoy following through with the pledge. This year I finally feel like I'm in the right place - sure, life is never simple (and it certainly isn't free from stress right now), but bring it on - I can't wait to be a part of this great challenge! 

Have a great week people! And I look forward to seeing all the wonderful Me-Made-May outfits shortly ;) 

Sunday, 19 April 2015

TNT mash-up wedding guest dress

We seem to have hit the age now where there is a steady stream of weddings to attend each year. It's always lovely to see our friends tie the knot to their wonderful other halves, and it also gives me an excuse to sew up a little dress to wear (not that I need any excuses!). Remember the 2 wedding guest dresses I made last year? 1 and 2

We attended a fantastic wedding yesterday in Bristol, in glorious weather. The sun was shining, with not a trace of cloud in the sky. We celebrated the love of a couple who are clearly perfect for each other, caught up with friends and met new ones, ate delicious food and drank a little too much bubbly, and finished the day off with super fun Ceilidh dancing in the barn :D  

I wanted to make something special for the occasion, especially as the hubby was an usher for the wedding and did a reading, too, during the ceremony. Elisalex came to mind, but this time I wanted a less extravagant skirt - as lovely as the last version was, I think one tulip dress is quite enough for my wardrobe. What better pattern to team the Elisalex bodice with than McCalls 3830?     
Elisalex McCalls 3830 Floral Dress Mad Men

Elisalex McCalls 3830 Floral Dress Mad Men

The fabric I used was a beautiful floral stretch cotton purchased from C&H in Guildford, which reminded me of a dress Betty wore for an advert for Mad Men (picture below), and this was indeed what inspired me to mix and match two of my TNT patterns. I'm celebrating the return of the second half of the final season of Mad Men in my own way. Plus, what year would it be without me making a Betty-inspired garment
Elisalex McCalls 3830 Floral Dress Mad Men

You are probably aware of my obsession with stretch cotton fabrics by now - for me, these fabrics combine the most awesome qualities of being well-behaved/super easy to sew with, having vibrant prints and the ability to stretch, accommodating a filling wedding breakfast as well as a lot of ceilidh dancing! 

One of the main reasons I love the Elisalex pattern is the low neckline at the back.  
Elisalex McCalls 3830 Floral Dress Mad Men
In addition to the changes I made and construction notes from the last two versions, I made a couple more small changes:

1) This is the first time I made a short sleeves version - I chopped off quite a bit of length from the sleeve pattern, and hemmed the sleeves by hand with uneven running stitches. 

2) I didn't line the bodice this time, since the fabric is not see-through at all, which is hard to come by when it comes to medium weight white fabric. This was a relief, since I didn't have any stretch lining in my stash. What can I say, this fabric just keeps on giving! Instead, I finished the neckline with a pretty bias tape using my favourite method

Here are some sneaky peek photos for you: 

Sleeve:
Elisalex McCalls 3830 Floral Dress Mad Men


Bias binding facing. I had this bias tape in my stash, but it was much too wide to be a facing, so I had to trim it down in half for this purpose. What a perfect match to the dress fabric, though?
Elisalex McCalls 3830 Floral Dress Mad Men neckline binding

Neckline on the outside:
Elisalex McCalls 3830 Floral Dress Mad Men Neckline
Back neckline with a sage green invisible zipper. I'm very proud of how well the waist seams are lining up! 
Elisalex McCalls 3830 Floral Dress Mad Men

 The dress hem, by hand with a blind catch stitch. 
Elisalex McCalls 3830 Floral Dress Mad Men Hem

So there you have it, yet another wedding guest dress! I absolutely adore this dress, and am so pleased with how it's turned out - I love the fabric, the shape, the comfort, and how well it's held up all day! I can't wait to wear it again! I enjoyed the process of sewing this little number, too. Mixing two of my TNT patterns is effortless - I'm happy with the fit of both in their own right, and adding them together is straight forward and very rewarding. 

How about you? Are you making any garments for special occasions this year? I have one more wedding to go to this year (unless any of our other friends feel spontaneous and have a last minute wedding before the year is out), which means one more special occasion dress to make. I think I'm going to attempt sewing with lace for that one! 

Sunday, 12 April 2015

My finished Lottie blouses!

As promised, here are my completed Lottie blouses! I made two versions - the red one with a vintage crepe from 1920s, and another in a monochrome semi-sheer cotton voile, which was a piece that I bought a few years ago as a "coupon" from Paris!  

This is going to be short post, as having hosted the sew-along, there is really not much else to say other than to show you a few photos. 
Simple Sew Lottie Blouse Sew-along Red


Simple Sew Lottie Blouse Sew-along Red

Simple Sew Lottie Blouse Sew-along Monochrome


Simple Sew Lottie Blouse Sew-along Monochrome

That's it! I'm really happy with both, and think that both will make lovely work blouses, and would be perfect teamed up with trousers and skirts. 

Now I can't wait to see yours ;) 
Related Posts Plugin for WordPress, Blogger...